
Dragon Quest Retrospective – Dragon Quest III

 Dragon Quest III is an interesting specimen to look at. Every game in the series starts with Koichi Sugiyama’s Overture except for this one. It was a conscious decision to create an original opening theme for the game rather than use the familiar overture, but if you’re curious why, you’ll just have to read this retrospective. The game also features another original starting menu theme, but is the last game to do so; every game after this one would just recycle this game’s starting menu theme.
At the very beginning of Dragon Quest III, not only do players get to choose the name of their character, players also get to choose, for the first time in Dragon Quest history, the gender of their character! Being as I wanted to name my character Sara this time around, I naturally chose to create a female and immediately got called a lad by my very own mother. Dearest mother, I know you’re getting a little senile in your old age, but I’m pretty sure you should remember that you gave birth to a daughter sixteen years ago.
Either that or it was just a typo. A proper lady is willing to forgive a typo.
Since it’s my sixteenth birthday, I’m off to see the king! The king greets me fondly.

…apparently the king is also in on this joke. Okay, I know I seem to be a late bloomer, but don’t you think you’re taking this joke a little too far? You don’t need DD-cup breasts to be a woman.

So yeah, even the game’s own dialogue boxes seem to be under the impression that the gender choice at the beginning of the game has about as much weight on the narrative as any of the “but thou must” choices from the first two games. The main character gets treated as a male in the opening scenes of the game no matter whether there’s junk in her pants or not. I even checked her pants to make sure and at least that menu got her gender correct, even if the entire population of Aliahan has been eating paint chips and contracted Professor Oak Syndrome.
I think the biggest insult out of this entire interaction was the stingy stipend the king gave me. Out of the entire royal coffers, and knowing that my enemy is the archfiend Baramos, the king was able to spare… 50 gold pieces. In all fairness, the hero of the game already comes equipped with the best equipment available in Aliahan, but if they want to make sure their companions are equipped well, they’ll not only need those 50 gold pieces, they’re going to need to grind for more money in the land surrounding the castle town, especially since the party’s Wizard gets targeted for death a lot throughout the game. Enemies largely ignore any soldiers or merchants or other characters with higher HP in the party and zero in on the wizard, killing them outright, over and over again. It’s very similar to Final Fantasy‘s early game AI attacking the Black Mage without mercy.
50 gold pieces is probably the least generous stipend ever, since that’s how much you can get from a few minutes of fighting outside Aliahan. Comparatively, King Lorik of Alefgard was much more generous, providing money equal to about a half an hour of early game grinding.
Unlike when I was playing Dragon Quest II, I felt like I was gaining power right from the start. Wizards feel much less squishy with the power of both decent armour and a few levels worth of experience, and I felt like I was ready to move on, once I unlocked all the doors I could in the starting tower and found all the treasures, including for the first time in the series, an Agility Seed. This is one of my favourite aspects of Dragon Quest, the ability to augment the stats of your characters to either shore up weaknesses or exploit strengths. A character that’s already pretty strong can be made even stronger if you want, or a character that is so slow that enemies always go first can be made to be a little less slow and maybe he or she begins to get a few hits in before their enemies do.

I also appreciate that now, treasure chests permanently remain open once they’ve been opened. At this point in the progression of JRPGs as a genre, neither Dragon Quest nor Final Fantasy had bothered to show which treasure chests had been opened until now. It always seemed weird that you could just re-open treasure chests as much as you wanted and be able to get the goods over and over again as if someone was coming along after you left and filling them back up. What, was King Lorik holding out on you and he could’ve given you more gold pieces but chose not to? Maybe he’s not as generous as I first thought.
This is also the first game where I feel like random enemy drops truly help the player. Granted, the Prince of Midenhall was given a few Medicinal Herbs at the start from enemies and it worked out well for him, but in this game, enemies like the Giant Anteater can drop – very rarely of course, since this is a Dragon Quest game – a Leather Helmet, which increases a character’s defense a little bit if they haven’t already been equipped with one. There’s incentive to not immediately grind for everything before exploring the next dungeon, especially if characters are able to defeat enemies without much trouble already.
Seeds for stat growth can also be randomly dropped by certain enemies, but they drop at such a low rate that it’s not worth grinding for them either, it’s better to just let them drop into your inventory whenever the RNG decides you’re worthy of receiving one.
Apparently one can also sequence break, if one believes that the game’s manual advises the best way to play through the game. Whereas I went to the Tower of Shanpane and took back the Golden Crown from Kandar at the behest of the king of Romaly, the manual insisted that I go and solve the problem that the village of Noaniels has first. Given that I heard about the Golden Crown before I heard about Noaniels and I felt I could reasonably survive the ordeal, that’s what I chose to do first.
If one has a priest in the party, they’ll learn Antidote around the time the party has reached Romaly, which will come in handy since enemies begin to be able to use Poison abilities right about then. The Wizard also learns a good spell to increase a character’s defense around this time, and perhaps now is as good a time as any to talk about the game’s class system.
At this point in the progression of Dragon Quest as a series, classes hadn’t been used before. Final Fantasy dabbled in classes right from the start, creating such iconic archetypes as the Black Mage, White Mage, Thief, and so on. Dragon Quest III put its own spin on classes, and I must admit, I don’t have a preference between the two games. On the one hand, I like the familiarity of Final Fantasy‘s classes, so that I instantly know what I’m getting when I see the name Monk or Dragoon. On the other hand, there are ways in which a certain class works in Dragon Quest that makes it less frustrating than its Final Fantasy counterpart. More on that in a moment.
One of the main things the series has done is make “Hero” a class that a character can have. The Hero is basically the main character of the game, and this character is usually able to equip most if not all equipment and gains a decent repertoire of spells for healing and for battle. In this game, the Hero’s MP starts out relatively low, making them less than ideal as a spell caster unless the situation requires an extra Firebal, but near the end of the game, Heroes will have enough MP to be able to do more than swing a sword around, and can ease the burden of healing the party in order to conserve a Pilgrim’s MP.
 In Dragon Quest III, players can create a party from scratch, as there aren’t any pre-defined characters except for the silent protagonist who apparently looks male to nearly everyone, even your own mother whom you’d think would’ve remembered that you lacked certain anatomy when born. I guess the choice of gender only affects the selection of equipment available to the character.
Classes available include the Fighter, which in this game refers to a character that the Final Fantasy series would refer to as the Monk. The Fighter prefers not to be equipped with weapons, opting instead to use fists. This character is fast and strong. One interesting thing that the game teaches players about the Fighter, if they talk to every NPC and wait around until night to talk to them all again, is that the Fighter can be equipped with Claw-type weapons without having it negatively impact their attack stat. The Fighter can also be equipped with a few other weapons, but like with the Monk in Final Fantasy, leaving their fists empty is a much better idea than trying to give them a sword.
The Soldier is what the Final Fantasy series would refer to as the Fighter. Soldiers can’t cast spells but instead are able to equip most weapons and armour and are strict physical attackers. Basically, the only thing separating the Fighter from the Hero is the Hero’s ability to cast spells.
The Merchant’s biggest claim to fame is the ability to appraise items. This usually helps players avoid curses, but that seems like the only thing Merchants are good for. In the original NES version, the one I played, the Merchant doesn’t tell you when a weapon has a secondary effect if you were to use it as an item, and they certainly won’t tell you what an item does if you don’t already know. Yes, I’m pretty sure I could guess that the Poison Moth Powder isn’t cursed, but WHAT IN ALEFGARD DOES IT DO?! That said, in my experience, I always appreciate that Merchants typically are decently strong and can often find extra gold after battle. When grinding for money to buy gear with, I like having a Merchant around.
The Goof-off has always struck me as being more trouble than they’re worth, but I suppose they feed into the series staple of making players put their trust in the random number gods. The Goof-off will often ignore your commands in battle and do their own thing. According to the manual, the Goof-off is “Without exaggeration, a useless living-being to take along in your quest.” The Goof-off harbours a secret though: if you can stand having them along and level them up high enough, they are the only class that can be changed to a Sage without an otherwise necessary key item.
The Wizard is to Dragon Quest what the Black Mage is to Final Fantasy, except at the time this game was released, the Wizard was much more useful. With spells that actually make sense for the Wizard to have (well, except maybe Upper, since that seems more like a defense spell than an offense spell) and which are actually of use to the party, the only real downside to having one along is the same as the downside to having a Black Mage along: they make up for their decent magic and high MP by having very low physical attack and defense as well as super low HP. This character is pretty much the Princess of Moonbrooke with extra spells, and having a Wizard along can be seen as playing a hard mode version of the game, even if the player is told that the class is a recommended part of their party. Be prepared to see the Wizard killed multiple times in one playthrough, whereas every single other class in the game has no trouble surviving all but the toughest boss fights. Sometimes the game takes this to an insane degree by having a confused party member “randomly” target the Wizard twice in a row and kill them before the party’s Pilgrim can heal them up. Basically, the Wizard is a damage magnet.
The Pilgrim is the Dragon Quest version of a White Mage, except this White Mage is actually useful for more than casting spells. Their attack power is comparable to the Hero and Merchant classes and they also rarely miss. For that alone, the Pilgrim is basically the embodiment of what I wish the White Mage class could be, and is much less frustrating to play than a White Mage. Since Pilgrims are able to do somewhat decent physical damage, they’re not waiting around for someone to get hurt in order to heal them.
Finally, the Sage class is a special, secret class that one can change to if they started as a Goof-off or if they have a certain item found somewhere in the world. Sages can cast everything that Pilgrims and Wizards can and are stronger than either class. Unlike a game like Final Fantasy III, you don’t need a Sage in order to beat Dragon Quest III. That said, it does make things a little easier, and there’s no denying the sense of pride and accomplishment a player feels when they’re able to turn one of their characters into this most coveted of classes.
As stated before, there is also the Hero, but only the main character of the game can be one. Heroes are able to equip many of the game’s weapons and armour and can also cast a wide variety of spells, but lacks MP for much of the game. It’s generally best to leave most of the spell casting to the Wizard and Pilgrim classes and let the Hero’s high strength speak for itself.
By the way, every class is illustrated in the manual with both male and female types, except the Hero. The Hero is only shown as a male. No wonder she had so many problems in Aliahan.
 Beginners to the game are wise to heed advice given both in the game and in the manual, and recruit a Soldier, Pilgrim and Wizard, but the Wizard is super squishy and players may or may not want to carry around such a walking liability. The Wizard can also be killed in the very first battle if the entire enemy group attacks them exclusively. That said, a Wizard’s spells can be second to none and can certainly mean the difference between life and death. The Soldier, meanwhile, could theoretically be swapped out for a Fighter or a Merchant, and even the Pilgrim can be swapped out since the Hero gains a healing spell, even if the Hero can’t cast it very many times before having to sleep at an inn. There is an answer for that problem: many enemies in the early game drop Medicinal Herbs, which are a decent substitute for healing for the first ten to fifteen hours of the game. Plus, not only is there a lack of key items during this period, there is a total of four party members possible this time around, which slightly increases the party’s overall carrying capacity above the previous game.
Perhaps owing to my being in a Redwall mood lately, I created a party inspired by some of my own personal characters: two rabbits, a squirrel and a lynx as the game’s hero.
Saving Noaniels means that the party learns about the next key that they need, a key which will grant them access to another continent, so they wander off in search of it. This is the main reason why the manual’s event order seems to be wrong, considering the order players learn about important events and items differs from the order they’re brought up in the manual. That said, solving Noaniels’ problem does open up all the shops there and makes the Cloak of Evasion available, which is a significant boost to the Wizard’s defense, so there is value in waiting until afterwards to retrieve the Golden Crown.
The story structure of Dragon Quest III is about halfway between the original structure of puzzling your way through the world to find the final boss and a more modern structure of giving the player quests and story missions. Not every quest is necessary to beat the game, as far as I can tell. You don’t need to get the Golden Crown or save Noaniels at all, for example, you could skip right to the Pyramid in the desert country of Isis in order to get the next key item. However, if you do that, you’ll end up grinding anyway to level up enough in order to survive, and the loss of the Cloak of Evasion would be very devastating to the Wizard, for even with it equipped, an unlucky encounter can still kill them. That said, it can feel rewarding to go and solve everyone’s problems, even if you don’t realize that the game doesn’t lock your objectives behind event flags and you don’t necessarily have to help everyone. It’s not quite the same style of open world as the first game, considering there are a few more key items required to progress and entire continents are locked behind that style of progression, but stronger enemies are located across bridges again. I would say this game is the perfect segue between the classic style of the first two games of the series and the gradual modernization of the franchise.
The developers of the Dragon Quest series also seem to have figured out ways to incorporate some of the booby traps they came up with from the previous game in ways which don’t make you want to tear your hair out. When the party is searching for the Magic Key, they receive a tip that it’s hidden in the Pyramid in the country of Isis. The pyramid contains a few pitfalls, but they’re placed in easy to remember spots and can be avoided. There are also buttons to press on the third floor of the Pyramid, two of which open up a pitfall and two of which remove a boulder and grants the party access to the Magic Key. According to a hint the party can find, there’s a certain order to the two buttons; if the second button is pressed first, it opens a pitfall. Basically, the developers took the pitfalls from the Cave to Rhone, incorporated them earlier in the game and placed them far better.
 There’s also a treasure room that can be unlocked with the Magic Key which leads to a room chock full of chests, all of which summon a bunch of mummies to attack, but which contain a few pretty decent items. The one problem with the Pyramid is that it’s also chock full of enemies who know the Sleep spell, which can not only prolong battles, but if the game’s random number generator isn’t in the player’s favour, it can also lead to one or more party members dying from being sleep-locked and unable to act, necessitating a retreat to recover. In fact, this can happen so many times in trying to explore the Pyramid and learn its secrets that the sheer number of times I Outside/Returned from the Pyramid rivals the number of times I had to do so in the Cave to Rhone.
It should be noted that, by the time you get the Magic Key, you’ll have gotten a feel for how much more generous the game is with its stat growth upon leveling up. It’s not like Dragon Quest II wasn’t balanced around the stats that its trio of characters gained, because it was. Dragon Quest III, though, tries to give players the feeling that they’re gaining power far quicker than they were one year prior. It’s not uncommon to see characters gaining three to five points and sometimes more in several stats, and even several two point gains per level is normal. HP and MP grow at a much more significant rate as well compared to prior games in the series, even for the Wizard.
Also, in comparison to prior games in the series, stat growth has a higher degree of randomness to it. You’ll notice when you save the game, level up the Pilgrim and they gain 10 HP and no spells, but for some reason you load up your previous save, regain that same level and this time the Pilgrim only gains 4 HP but has gained two new spells. Stat growth and the character’s ability to learn spells are much more random now than in prior games.
That said, just like how the previous game seemed balanced around the kind of power the Prince of Midenhall was able to gain, this game seems balanced around the kind of power the Hero is likely to gain. The Hero’s survivability is also easily comparable to all of the more physically fit party members like the Fighter, Merchant and even the Pilgrim, and classes like the Wizard are sadly left behind; there’s a reason I called that class the game’s Hard Mode earlier.
The Wizard’s high magic power and low everything else is basically Dragon Quest in a nutshell. A lot of the design aspects the series is famous for can be summed up with the phrase “high risk, high reward”. I didn’t mention the lottery in my article on Dragon Quest II because it operates very differently from the lotteries and casinos that show up later in the series. The lottery in Dragon Quest II can be played at no cost to the party due to enemies dropping Lottery Tickets. Lottery Tickets are also available as free gifts from certain shops, but since you’re going to buy stuff anyway, you’re not investing money towards the slim possibility of a payoff. And slim possibility it is, I don’t think I ever got anything except the least valuable prize: another Lottery Ticket. Basically, I only ever won the chance to try again, but never felt like I’d been wasting money by playing, I was just wasting time. Eventually, I decided to just sell the tickets and be done with it.
Dragon Quest III actually contains gambling mechanics, since a few of the towns in the game have monster arenas where you can gamble actual gold coins towards the possibility of acquiring more. I suppose as the series progressed, Yuji Horii was able to add more and more casino-type minigames into the series, but early on it was more a case of trying to figure out what sort of gambling features he could incorporate into the games, within the limitations of the NES. Each of the Dragon Quest games on the NES represents the developers experimenting and seeing what works and what doesn’t.
 One thing that seems to work in the game’s favour is the open world aspect of exploration once the player has fetched some pepper for the king of Portoga and received a ship in exchange. That’s either the best pepper in the entire world or it’s a very cheap ship*.
Once on board, players can sail around the world like in the second game and look for adventure. Clues found almost right away will either lead players to the village of Lancel, far to the south of Baharata, or to the village of Jipang, having followed the shore all the way around the world from Portoga. The game’s manual lists several destinations the player can go to before Jipang, but all of these can be visited in any order. In fact, players could visit Jipang first if they were to choose to do so, and defeat Orochi at a lower level than the manual recommends. It helps that the Cave of Jipang contains Metal Slimes, the first Metal Slimes in the series that actually act like Metal Slimes. In the first two games, these enemies can award more experience points than other enemies in the area, but not by much. In the second game, you could even defeat them without too much trouble, since they didn’t have a drastically high defense stat. Metal Babbles also existed in the second game, but they were fast and would almost always run from battle and it was very difficult to defeat them, since the Prince of Midenhall didn’t have enough attack power to kill them in one hit.
Here in Dragon Quest III, Metal Slimes have the highest defense possible and are relatively fast. Not as fast as Derangers, who are so fast when first encountered that they always go first and always cast Chaos, a spell that causes a party member to become confused. The spell has a relatively low chance of success, but it’s possible to have three party members get confused in turn one and then it’s easier to just run from battle than struggle through while everyone beats each other up. Metal Slimes can cast Blaze on a party member, they can attack physically or they can run from battle. They run often, and since they have a high defense, they’ll only ever be dealt one HP damage at a time, if the attack even connects. It’s usually sheer luck if a party can kill more than one at a time, a feat which can be accomplished a lot easier with critical hits. That said, here’s a screen shot of my party receiving experience points from three Metal Slimes killed without a single critical hit. Unlike the first two games, Metal Slimes in this game grant a pretty high amount of experience, and killing several at once can almost guarantee that one or more party members will level up or be really close to one.
Something I thought was particularly well done in the game was the way players were expected to learn about the secret of the village of Tedanki. Going south from Portoga, if players decide to venture down rivers, eventually they’ll find one that leads to a village sitting near a point where two rivers meet. This village was destroyed by Baramos but most players will arrive at night and discover that it’s still a busy, bustling village. However, during the day, everyone’s gone. It turns out that the village is full of the undead who rise at night, and clues that players find during the day point to an important item being located there. That important item turns out to be one of six Orbs that players need to collect in order to unlock flight.
By the way, Tedanki doesn’t show up in your Return list, likely because it was destroyed and therefore no longer really exists.
 There’s something I’ve neglected to talk about ever since my articles on the first games of each of the Dragon Quest and Final Fantasy games, and that’s the music of each game. Final Fantasy II has the first of my favourite battle themes from the series, for example. Dragon Quest III includes music that sounds like it’s trying to evoke certain real world locations. (And this should be your first clue that the game’s world is…) Isis and the Pyramid feature music that sounds almost Arabian, as if Aladdin himself is going to show up and assist you. He doesn’t, but it wouldn’t have been surprising if he did. The name Isis itself is Egyptian and has always been Egyptian, it’s just been in recent years that the name has been Hitlered, a word I am using to mean “when a perfectly good name is tarnished by being used by a person or group who does great evil”. Isis is the name of an Egyptian goddess who took on a lot of roles over the years as her story was told and retold, at one point taking over roles and traits in Egyptian mythology that originally belonged to Hathor. She played a major role in Osiris’s death and resurrection, among other things.
The relationship between music and setting in the game can also be seen in Jipang, where the country is suffering in the midst of the Orochi myth. When you enter Jipang, a noticeably Asian-sounding song plays and the architecture of Jipang deliberately evokes an Asian feel. Players of games such as Okami will already be familiar with the myth of Orochi, an eight-headed serpent who would eat one sacrificial maiden every year from a nearby village (Orochi’s clearly watching his weight). Susano-o discovers this problem when only one maiden remains and he slays Orochi and happens to find a pretty decent sword within the slain beast. Dragon Quest III even plays this part straight by having Orochi drop the “Orochi Sword.” I guess players will be able to figure out that Orochi is a boss enemy that needs to be killed but they’ll have no clue what a Kusanagi is.
Not every location is scored with the intended real world influence in mind. A couple good examples are the village of Soo and the historic Castle of Eginbear. In a game where Isis and Jipang were scored appropriately to their real world inspirations, one would expect Koichi Sugiyama to either incorporate aspects of Dvorak’s Symphony No. 9 in E-minor into the village theme of Soo or simply write a song for the village inspired by it. Instead, the game’s generic town theme is used instead. One would also expect a kind of British monarchical influence to the castle theme in Eginbear, but I suppose there’s already that sort of flavour to the game’s generic castle theme, since the Dragon Quest series is largely modeled after the tropes of medieval fantasy, right down to the pre-gunpowder era European-style castles that every continent in every world in the series seems to have. Anyway, the theme in Eginbear is the standard castle theme of the game instead of a unique theme. It seems like, outside of the game’s obvious Egyptian and Asian style countries, the rest of the world was designed in a more generic Dragon Quest style.
 Eginbear is interesting in another manner. As the world opens up once the party acquires its ship, one of the places they can go is the historic Castle of Eginbear. However, for some reason, the people of Eginbear are very xenophobic and won’t let “yokels” in. At least they didn’t say we were from the north.
In order to get into post-Brexit Eginbear since the party has need of a certain key item that can be found within its walls, the party has to somehow get past the guard, but the guard is unwilling to let them pass even when they do have a sword and shield they can wave in his face. Instead, the party returns to sea and eventually finds their way to Lancel, south of Baharata. In the party’s journeys, they heard tell of an item called the Invisibility Herb. Even if this information is forgotten – it is a rather long game, after all – the moment the party hits up the item shop in Lancel to see what’s on offer, there’s the Invisibility Herb. This is meant to be an “aha!” moment for the player, because this herb turns the party invisible for a set period of time, just long enough to sneak past the guard and infiltrate Eginbear. Once inside, no one seems to have a problem with your presence, and even though the guard’s line doesn’t change if you speak to him again, he won’t actually kick you out once you’re in. Even if the player doesn’t figure out that they should use the Herb in this manner, someone in the north of Lancel will spell it out for them.
Not only does this grant the party access to the Vase of Drought, they hear about some shoals out in the ocean that the vase can then be used on. That, coupled with the clue from Lancel that the vase is needed in order to obtain the Final Key, would lead players to deduce that this is the location of the key. All the while, the player is exploring in an open world style and learning more about the world without the game seeming to screech to a halt. Progress is constantly being made.
Character progress is being made, too. Eventually, the wizard becomes a little less of a liability simply because of how much HP they finally receive. This is also the part of the game where significant stat growth occurs across the entire party, and it can be quickly seen that the party in Dragon Quest III is stronger than the trio from Dragon Quest II, and not just because there are four of them now. The Wizard closely resembles the Princess of Moonbrooke, but surpasses her HP quite easily. It also helps that experience curves, while still steep, are based on specific algorithms now and not arbitrarily calculated by the developers. Gone are levels which require an even number of experience points and which seem to increase that requirement in an arbitrary manner. No one class will severely outpace the others. Even the Merchant class, which early on is about two levels ahead of other classes, slows down after a while. The one exception seems to be the Hero class, which starts out lagging behind most classes in the game in levels but then eventually catches up. There is another exception in that the Sage class requires a very high amount of experience to level, but this just makes the rewards for having a Sage all the sweeter, if players are willing to put in the effort.
Mentioning the Sage is a great segue to talk about the Dhama Temple. (Ugh, I can’t wait for Dragon Quests VI and VII so I can actually call it “Dharma Temple.”) Along with the novel concept of a class system, this game also allows players to change the class of their characters. Some games allow characters to keep their level intact when changing classes, but Dragon Quest III does not. Instead, although the character’s level is reset to one, they keep exactly half of their stats and this potentially means that a wizard could have the strength to do more than two points of physical damage to an enemy, and that’s just for example. The one thing that the game won’t allow players to do is change the class of the Hero, since in this game, “Hero” is a class. This makes me wonder if changing the class of the Hero would have the same effect on the world as changing Firion and his friends into frogs. Would the Hero no longer be allowed to save the world if their class was changed? Would the world be doomed and the Hero’s entire lineage be erased from history because their class was changed to something like Pilgrim?
Yeah, I’m not writing a story this week.

If it hasn’t been completely obvious by now – and to be fair, later games in the series do deliberately model specific countries after our own, right down to the terribly transliterated foreign accents “speaking” English – the world of Dragon Quest III is basically Earth. With this in mind, some nations are more appropriately named than others. I’m assuming this design decision was made for two reasons. One, it helps those who already know the geography of the world to navigate this one without having to acquire or look up a physical map of the game’s world somehow, and also keep in mind that this was before the general consensus that games would just give you the map of the world at the press of a button. And two, it likely drove home the point that the main hero could actually truly have been you. This latter point is important for another reason entirely, but players wouldn’t learn this reason until defeating what they likely thought was the final boss of the game, the archfiend Baramos.
Occasionally, the localization team had a bit of fun with the translation. The Romeo & Juliet reference in Dragon Quest II made my eyes roll, but I thought the tragic tale of the Phantom Ship in this game was handled much better. You see, Errol and Olivia are tragic lovers who became separated when Errol became lost at sea. Olivia couldn’t stand to live without him so she committed suicide by throwing herself off a promontory, but as a result, she cursed that promontory and no ship can get through any more. Meanwhile, Errol was also cursed to wander the seas forever on a ship of the dead. However, finding a locket on the ship and casting it into the waters of the promontory will reunite the lovers and lift the curse, allowing passage to the island prison where another tragic character met his end, but he carried a key item that can be used to open up another path in a similar vein to the Watergate Key, except this time a river is being destroyed rather than created.
There’s a lot of tragedy in this game.
The names Errol and Olivia might sound like two random names someone came up with, either during development or during the localization process, but to someone who’s seen the 1935 film Captain Blood**, the names should be very familiar, especially in relation to the high seas. Captain Blood stars Errol Flynn and Olivia de Havilland and is about a doctor who turns pirate in order to escape a life of slavery. The movie isn’t particularly tragic, given that both Peter Blood (Errol Flynn) and Arabella Bishop (Olivia de Havilland) survive. It should be noted that, according to later versions of Dragon Quest III, Olivia’s lover is named Eric, likely because the reference to Captain Blood was not originally intended by the developers. It would also explain why the two lovers die tragically in the game but their movie counterparts do not.
 Sometime near the end of the game, players will notice that their wallet is no longer limited to 65535 gold pieces. Instead, they’ve been given a bigger wallet, one that can handle… 99999 gold pieces! Okay, it doesn’t seem that much bigger than before, but it’s a start. It’s approximately 50% bigger, but that’s not even the best thing. The best thing is that this game introduces a bank for players to store gold in. This innovation protects the player’s stored gold from the death tax, which makes saving up for things that much easier. If you really, really want to have one of your female party members walking around in the Revealing Swimsuit and you don’t want to risk losing tens of thousands of gold right before you can afford it, the bank’s there for you.
By the way, the Revealing Swimsuit isn’t worth it. By the time you can afford it, even the Wizard has better armour. Plus, even though it does alter the sprite, if you’re looking for something titillating, you’d be very disappointed. NES sprites don’t do “titillating”.
It doesn’t feel like there’s anything else to spend that full wallet on either. By the time the equipment shop in Someone-ville is ready to sell you the best gear, the party will either already have it or have found better. The only reason to even keep coming back to Someone-ville is because this is where an orb is eventually found, an orb that’s necessary to complete the game with.
By the way, I’m not forgetting the name of Someone-ville. Someone-ville is named after the Merchant you leave behind the first time you check out the spot on the map. I didn’t want to leave my Merchant Michael behind so I created a new one, named him Dude just for something to name him and left him to begin building his capitalist paradise. He got a bit carried away with Dudeville, making it a place of predatory, unchecked capitalism and eventually he exploited his workers so much that they revolted against him and threw him in jail. He should be relieved that he didn’t get the guillotine. Now, I’m not saying we should murder all the billionaires, but…. All I’m saying is that the story of Dudeville is even more appropriate now than it ever was before. A lot of us “essential” workers are feeling exploited by capitalists who are deathly allergic to shutting down the economy for the safety of their staff. Their bottom line, to them, is much more important than the health and safety of those in their employ.
While capitalism can be frustrating, I’m pleased to say that the penultimate dungeon this time around is not. Not compared to the Cave to Rhone, anyway. There are pitfalls that are deliberately shown as you go, there’s one path that constantly repeats on the third floor which is easy to avoid, and the only real reason to keep on Outside/Returning is simply because the dungeon is super long. Enemies do know both Defeat and Beat, but in my experience, no one knows Sacrifice. While the Beat and Defeat spells can be pernicious, the Vivify spell can now be used during battle, so the only reason to throw your controller at the screen is if your Pilgrim drops dead from it.
(Okay, I call it the penultimate dungeon, but…)
The Wizard’s RobMagic spell can really come in handy during this dungeon. Not every enemy is particularly susceptible to it, but if wave after wave of Minidemons attack, your Wizard will be constantly topped up with MP, stealing it in one battle and using it in the next. Hologhosts are the ones who can cast Beat and Defeat and generally are a pain to have show up, and while they are somewhat susceptible to RobMagic, they have enough MP to be able to cast Beat and/or Defeat even with a few MP stolen. The last couple floors are generally the killer ones, with enemies far less susceptible to being robbed of magic, so it’s best to save your magic for them.
Once the dungeon is finally traversed and the final orb received, and all six orbs placed and the phoenix hatched from her egg, since this is what the game’s macguffin hunt is meant to unlock, flying is now available for the first time in the series. Flying bypasses all random encounters and can take you anywhere in the world, so grabbing another Leaf of the World Tree is easy. Getting to the final boss’s castle with your HP and MP intact is easy. Going around to anywhere you might’ve missed is easy. Perhaps because of this, Baramos’ castle is a bit more complicated than both Charlock Castle and Hargon’s castle were. It’s also surrounded by both mountains and a moat, so flying is the only way to lay siege to it. Say what you will about starting out the original game with your end goal in sight, it really was kind of brazen for the Dragonlord to take up residence within sight of Tantegel. Compared to that, Baramos is incredibly well prepared, and yet even he is no match for a group of very determined heroes.
 Players who make it to the Baramos fight are likely around level 35ish. At this level, not all of a caster’s spells are unlocked, and that should likely bother players, especially since the three royals from the previous game were able to unlock all of their spells before facing Hargon, and the lone hero from the first game unlocked all of his spells by about two thirds of the way through his quest. You can defeat Baramos at this point unless you get unlucky and he successfully casts Chaos on your main healer.
Savvy players will wonder what’s up, given that there aren’t any surprise bosses or a man behind the man reveal immediately after defeating Baramos. The game acts like it’s over. There are no more enemy encounters, damage tiles no longer work and the Return spell only brings you back to Aliahan (where finally the hero finds the one person who isn’t utterly senile and it’s the oldest man in the town). For all intents and purposes, the quest is over. The game is done… or is it? For there is finally revealed a world of darkness and a man behind the man.
Dragon Quest III already clocked in at a respectable 38 hours when Baramos was defeated, but the revelation that there’s a hidden boss behind the boss easily adds on several more hours to the game’s play time. Yeah, so it turns out that the dungeon I called the “penultimate” dungeon isn’t. Baramos isn’t the final boss. There’s a whole new world to explore and although this revelation comes out of nowhere, the reveal of what this other world is called should soften the blow a little.

In a stunning revelation, Dragon Quest III is actually a prequel and not a sequel. The hero and her party find themselves in Alefgard, saving the world the player has saved twice already. The best thing about revisiting Alefgard is hearing the familiar music playing, albeit embellished. It’s a fitting update to the familiar tune that played in the land of Alefgard in the first two games, and somehow the tune becomes grander as a result.
Although it was never established why she did so, Dragon Quest III reveals that the land of Alefgard was created by a goddess known as Rubiss and by the time of this game, it’s turned into a world of darkness that is somehow reachable through a hole in the main world. The world is somewhat different than the Alefgard that was saved by the lone warrior or the royals in previous games, in that Sara and the rest of the group can’t get around quite like players are used to. The geography of the world is rough and untamed, considering the fierce enemies that Sara has to contend with.
One nice touch, though, is that occasionally a group of slimes will appear in battle within proximity of Tantegel. The castle is their home, it seems, and not even giant murder skeletons can stop that.
Players who remember Alefgard from prior games are given a ship to sail around in an effort to find all the familiar towns and try to acquire the items required to form the Rainbow Bridge in order to get to Castle Charlock and lay siege to it again. Enemies in Alefgard drop a lot of experience points, which gives the perception that a character’s level is going to skyrocket. And indeed, players will gain several levels while trying to gather all of the key items necessary to beat the game. The high yield of experience from enemies perfectly compliments the high amount of experience required to reach the next level.
As a bonus, Metal Babbles occasionally appear around Rimuldar, even if they often run. That said, if you’re a patient grinder, eventually a few of them will fall to your sword, but by this point in the game, each Metal Babble awards the same amount of experience as four to six regular battles, so it doesn’t even save that much time to kill one.
It’s at this point in the game that it becomes apparent that players are supposed to switch the classes of their party when they first reach Dhama. Not only will each member of the party retain half of their stats going into their new class, but it won’t take long to regain the stats they lose in the transition and become mightier than they were as their starting class.
I mean, it is possible to beat the game as everyone’s starting class, but around level 40 or so, classes stop gaining as many stat points per level, so a level 45 character is maybe roughly one level stronger than a level 40 character. While this is going on, the Hero class is gaining stats faster than before, perhaps due to the fact that the Hero cannot change class, so a higher stat growth compensates for this lack. By the time everyone faces Zoma, it’s a good possibility that the hero will have anywhere between 350 and 400 HP, making them stronger than the hero from the previous game, and more than twice as strong as the hero from the first. If a character has had their class changed at Dhama and been grinded back up to power, they should have comparable stats to the Hero as well.
Everyone is going to need those stats, for Zoma has been balanced with that visit to Dhama in mind. Approach him with everyone’s starting classes, and beating him is a function of luck, not skill. He goes twice in a turn, has two AOE attacks, one of which will do a lot more damage than the other, and his physical attacks are devastating, especially against the Wizard.
The worst aspect of this battle, and he’s the first final boss to do so, is that he’ll randomly erase all of the party’s buffs. If a player is lucky, he’ll wait several turns before he uses this move, leaving characters capable of dealing up to 300 or more damage to him. Given how low his HP is, it’s assumed that the battle will be over quickly… except that what the game doesn’t tell the player, and indeed the manual does not either, is that Zoma is silently regenerating health each turn. This is something that players will only find out if they happen to visit a Wiki.
 Fortunately, after the fake out with Baramos, Zoma is indeed the final boss of the game. At this point, all of the lingering plot threads have been dealt with, including the final fate of Ortega, who is discovered fighting the King Hydra in an auto-battle. Take note, everyone, that this is the game where Chunsoft figured out how to make characters automatically battle each other, both in the monster arena and in this scene at the end of the game. The worst mechanic in the Dragon Quest series gets its start in the most beloved game in the series.
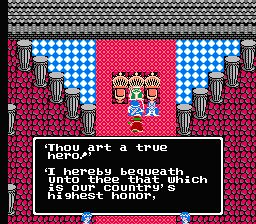
Sure enough, the light returns to the world of Alefgard, but the way home is sealed away forever, trapping Sara and her friends in this new world, so they decide to go see the king of Tantegel Castle. It is after she talks to him that the player finds out one more aspect of the lore of the world, one which may come as a surprise: it turns out that Sara is the warrior whose name was on the lips of everyone in the first game. “Erdrick” is revealed to be a title and not the actual given name of a person! Sara is also given a fanfare by the grateful people of the kingdom, one which is familiar to series veterans: the overture that was missing from the beginning of the game plays here at the end to give the player one final blast of nostalgia.
What’s interesting about this is that Erdrick has always been thought of as a male and so has Sara throughout this game. Could it actually be possible that Sara is just such a person that everyone in all worlds misgenders her for all time? The curse of the archfiend is a despicable one indeed.
And with that, the Erdrick Trilogy ends. Where does the Dragon Quest series go from here? How does it develop? And how does Final Fantasy develop alongside it? The Retrospective continues next week…

Notes
*It actually turns out that historically, pepper used to be very expensive. Keeping that in mind, it’s no longer surprising that you can buy a ship from the king with a bit of pepper.
**Errol Flynn and Olivia de Havilland starred in eight films together; the only one featuring swashbuckling action on the high seas was their first film together, Captain Blood.


About The Author
Joseph
Panthera Editus | In the great frozen land in the north known as Canada, a little to the east of that other frozen land in the north known as Alaska, resides the gaming enthusiast whom most people know as Joseph. When he’s not gaming or writing about gaming, he likes to enjoy life’s little ironies. Twitter
