
DIY – How to Set Up a Wireless Ethernet Bridge for Your Xbox 360

feature that covers a variety of topics relating to technology. If
you’re seeking a more hardcore DIY culture, you’ll probably want to
frequent a site such as Instructables.com
or even Gizmodo.
It’s been quite a while since I last wrote a DIY article– nearly a year to the day. While I hope DIY articles will be posted with more frequency I can’t make any solid promises. Anyway, on to the article.
In terms of overall value the Xbox 360 clearly lags behind the PS3 in terms of included features. One of the biggest disappointments with the console is the noticeable lack of a built-in Wi-Fi feature. This feature even comes standard on the Nintendo Wii. Sure, the 360 has a built-in Ethernet port and wired connections are arguably faster than wireless ones. Still, not all gamers are able to, or necessarily want to use a wired connection. Microsoft does have a number of wireless solutions for gamers, but official wireless adapters are still expensive, even when they are on sale. The official wireless adapter for the original Xbox is marginally cheaper, extremely hard to find, and requires patience to set up with the 360. Fortunately, setting up a wireless Ethernet bridge for the 360 is an inexpensive way to get around Microsoft’s official wireless adapter.
For this how-to guide I will be focusing on the ASUS WL-330gE Multi-functional Wireless AP. Other Ethernet adapters can be used successfully with the 360, but the ASUS WL-330gE is among the easiest to set up. Case in point, when I originally sought out a wireless bridge for my 360 I initially went with the Encore ENRXWI-G. Setting it up took a frustrating five hours of work. The instructions were vague, the online browser set up was confusing and actually conflicted with my router’s browser based set up at times. Once I got the Encore up and running it functioned wonderfully– until it stopped working one evening. I was unable to set it up again and was unable to find an affordable replacement Encore. That ultimately lead me to finding the ASUS WL-330gE and after spending only a half an hour setting it up (versus five hours) I was very satisfied with the ASUS.
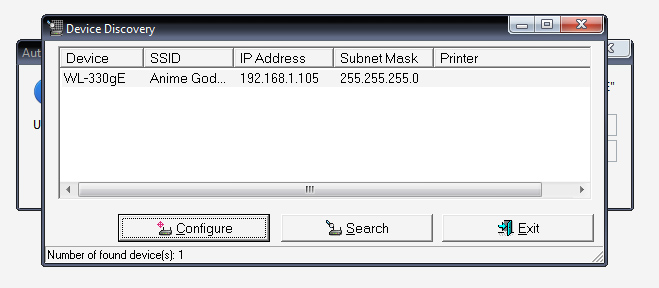
In order to set up the ASUS WL-330gE you’ll need to first configure the wireless AP on a PC before plugging it into your 360 via the Ethernet port. Although the ASUS can be configured through a web browser I suggest using the included CD. It comes with a device discovery program which automatically takes you to ASUS’s browser based set up page. All you need to do is simply select the wireless AP from the list and click on the “Configure” button. To make things easier I suggest turning the broadcasting feature on your wireless network (the SSID) in so that the WL-330gE can quickly connect to your network. If your network broadcasting is off, simply log on to your router’s web based set-up and turn it on, you can also disable the broadcasting after you set up your Ethernet bridge.
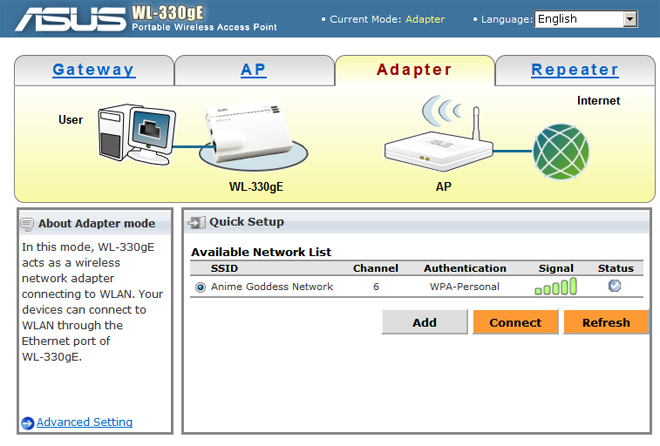
One you’ve accessed the web interface immediately click on the “Adapter” tab in order to set the WL-330gE up as a wireless Ethernet adapter. Your wireless network should immediately show up in the list of available networks. If it doesn’t, enable SSID broadcasting. Alternatively, you can also manually enter your SSID name by clicking on “Add,” but your network doesn’t always register properly. Before clicking “Connect” I’ll also suggest that you do some housekeeping first by clicking on the “Advanced Setting” link in the lower left corner.
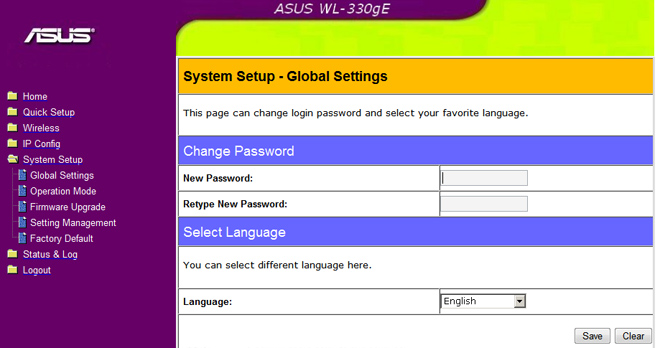
Clicking on Advanced Setting will take you into the system set up page. The first thing I recommend doing is changing the default password on the WL-330gE for security reasons. The last thing you want is for your network to be easily accessed by an unscrupulous neighbor looking for free internet access. (You should do the same for your wireless router if you’re still using the default settings.) Next, go to the IP Config page and change the last number of your static router IP address. For example if your router has 192.168.1.1 as its IP address you should change your WL-330gE to 192.168.1.2. Your router actually allows you to pick an IP address ranging from 1 to 254, more than enough addresses for each connected device (this includes desktop computers, laptops, and anything else that utilizes a wireless connection) to have its own unique IP. If you decide not to change the default IP address for your wireless bridge you run the risk of having each device conflict with one another.
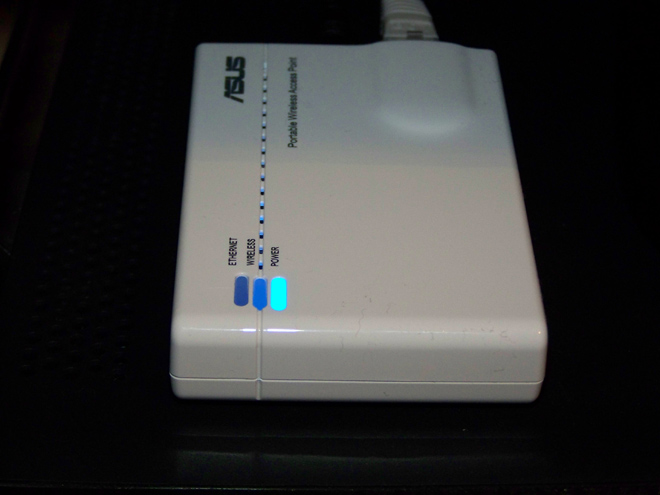
Once you’re done making the necessary changes, save, and you’ll be returned to the default web set up page. Once there the Adapter tab should be your default page. Click connect and try accessing the internet through your WL-330gE. If you are successful you shouldn’t have any problems using the Ethernet bridge and it should run similarly to a wired connection. Now attach your wireless Ethernet bridge to your 360. You have the choice of powering the adapter through an outlet or through your 360 with the included USB plug. Be warned, if you use the USB plug the adapter will constantly draw power from your 360, and the bright blue indicator lights can be a nuisance while trying to sleep.
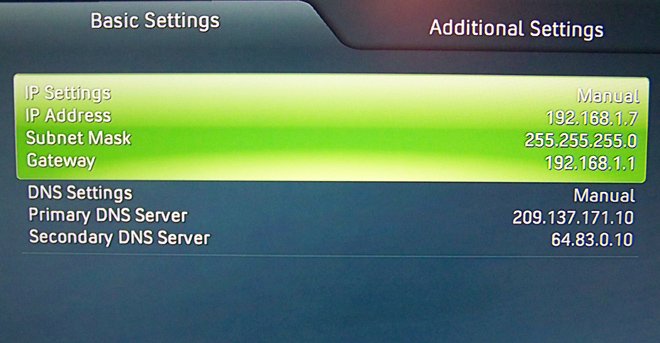
Once you turn on
your 360 you should automatically connect to Live, and the connection will behave similarly to a wired one. All of the settings are saved automatically to the WL-330gE and a quick check of your internet settings via the 360’s dashboard will confirm this. If you’re having problems connecting to Live make sure you’ve set your IP and DNS settings to “Manual.” If you continue to have problems connecting to Live, check your port forward settings on your router. If you need help with this PortForward.com is a great resource. Otherwise, your Ethernet bridge should be working without problems. The great thing about the ASUS WL-330gE is that the adapter can be pulled from a 360 and used with a desktop or a laptop without any additional configuration. You can also use multiple WL-330gE adapters with various Ethernet capable devices, as long as their IP addresses are unique. Additionally, the WL-330gE can be used as a wireless repeater, range extender, access point and a gateway. In short you can’t go wrong with this device. And at a price usually ranging from $60 to $36 dollars the ASUS is a steal compared to Microsoft’s overpriced peripherals.
If you want to know more about wireless Ethernet bridges, About.com and Wi-Fi Planet are excellent places to start.

About The Author
Angela
Executive Editor | Angela has had an addiction to video games and cartoons since she was young and impressionable. She enjoys writing long articles about these subjects and whatever else catches her eye. Mastodon

Just set up my WL-330gE to use with my VOIP phone. A few comments:
– The setup CD is Windows only. Mac users are limited to the browser interface, but that’s not really a problem.
– In the above instructions where it says “Next, go to the IP Config page and change the last number of your static router IP address.” What you need to do is make sure the DHCP server is turned off, then change that static router IP address to an appropriate address within your LAN’s address range. i.e. if your router is 10.0.0.1, then you will need to change the WL-330gE’s address to something like 10.0.0.2. Also, you need to confirm that that WL-330gE’s subnet is identical to your LAN’s subnet. Then click finish. Once you do that, you will have to access the interface at the new static IP address that you just gave it.
The WL-330gE is an amazingly versatile little device. I didn’t know it could do VOIP in addition to being a router, range extender and ethernet bridge. Thanks for sharing this little tidbit of info here!